Windows 10 is the most stable computer operating system we’ve seen so far. In general, it can run smoothly almost on any computer. Still, on some computers, especially lower-end computers, Windows 10 may be a bit slow. Nevertheless, it can be fixed by using some tips rather than swapping the hardware. So, if your Windows 10 computer is slow, here are the seven tips for you on “how to speed up Windows 10 computers.
Please note that we’re not gonna use any third-party software to achieve the Windows 10 performance boost, and also, these are absolutely free and less prone to system issues.
7 Fixes To Speed Up Windows 10:
Delete Temporary Files:
When you run a program Windows 10 will automatically create temporary files to store information as you go along. This not only helps to perform the program smoothly, but it helps with recovery process in case your PC close or shut down unexpectedly. So temporary files are very useful.
Temporary files supposed to delete themselves once they become redundant. However, sometimes they do not delete themselves and hence consume storage space and eventually, it slows down your PC.
To bring up the list of temporary files, press ”Win + R” key together and type ”%temp%”. From here select all temporary files and delete them. Now restart your PC and see the differences in speed.
Reduce Visual Effects:
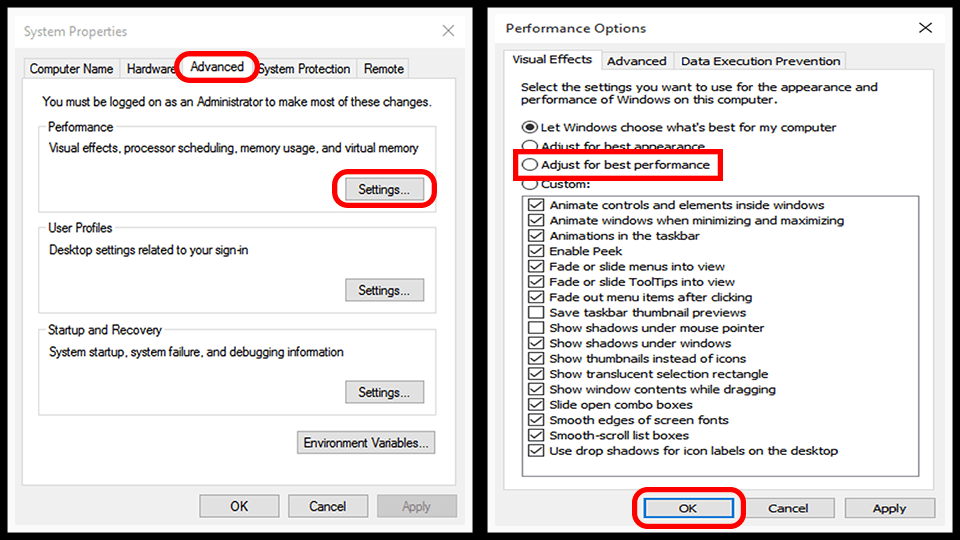
By default, Windows 10 use fancy visual effects ( example: windows and taskbar animation, icon shadow, aero peek, etc.) to make the appearance more catchy. However, these visual effects consume a part of the system resources may causing slow down your devices and can also impact on battery life. Though you can cut out these visual effects by performing the following steps.
- Open “Run” command by using “Windows Key + R“
- Type sysdm.cpl and then click “Ok” to launch the “System Properties“
- Navigate to the “Advanced” tab and click on “Settings” inside the “Performance” box
- On “Performance Options” select “Adjust for best performance” under “Visual Effects” to disable all the effects and animations.
- Now click on “Apply“
Once you have complete the above steps, you will surely feel a faster speed while navigating Windows 10.
Run Windows 10 on High-Performance Mode:
Windows 10 runs on balance power mode by defaults, which automatically balance the performance and energy consumption by hardware. However, erratically it can cause of the lag of power in different segments of hardware. As a result, many components of the motherboard like CPU, GPU, etc. may not be able up to the mark. Hence the system can be slow down drastically for this reason. To get rid of this
- Right-click on the battery icon
- Click on “Power Options“
- Select “High Performance“
Increase Virtual Memory:
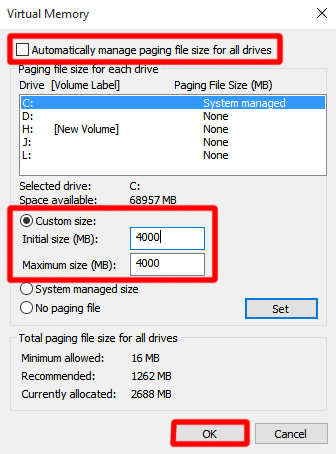
Virtual memory acts like physical memory or RAM in Windows 10. When a system is running out of the RAM, Windows 10 automatically create virtual memory or page file in the hard disk and transfer extra information from the RAM to it. This is how Windows 10 can run many applications together with no error. However, virtual memory put enable by default in Windows 10, but sometimes the default size of virtual memory may not be sufficient. Especially, if your system accommodates less RAM, then in many instances both RAM and virtual memory can get exhausted causing slow down your system. To increase the virtual memory in Windows 10
- Press “Windows key + R” to open the Run command.
- Type sysdm.cpl and then click “Ok” to launch the “System Properties“
- Navigate to the “Advanced” tab and click on “Settings” inside the “Performance” box
- On “Performance Options” navigate to “Advanced” tab and click on “Change” under “Virtual memory“
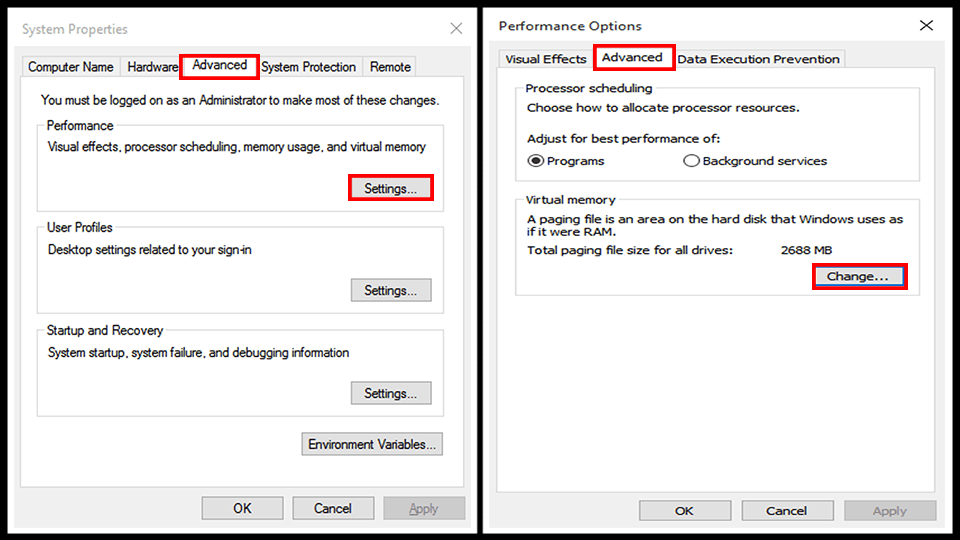
- On “Virtual Memory” un-tick “Automatically manage paging file size for all drives” and select “Custom size“
- Now enter the value for both “Initial size” and “Maximum size” and click “Ok” (You can also choose the drive partition where the page file will be stored, by defaults in “C” drive)
Once you have completed the above step, restart your system and you will surely observe a little gain in system speed, especially when multiple programmes are running on your system.
Free Up Storage:
Windows 10 needs sufficient free space to work adequately. Otherwise, it may slow down the system as the operating system require space to use the swap file, prevent fragmentation, and to create temporary files, etc. Therefore if you see a red sign on the storage partition especially in “C” drive you should free up some space so that Windows 10 can run smoothly.
You can free up storage space either manually or by using “Disk Cleanup” feature of Windows 10. To use Disk Cleanup:
- Type “Disk Clean” on the “Search Windows” and then open it
- Select the drive you want to clean then click Ok.
- After selecting the drive, Windows will scan the entire drive and list out all the unnecessary files.
- Now check all the listed file and click on Ok.
Defragment Hard Drive:
When you store something, information bits are getting occupied by several blocks in the hard drive. This is known as fragmentation of information bits. Now when you delete something that means you delete the bits, not the fragmented blocks. Later on, if you store some new files then Windows OS fills these blocks again, though in a disorganized manner. Therefore, Windows can take a bit of extra time while accessing these disorganized bits.
Defragmenting hard drive means to relocate these blocks in an organised manner so that Windows can access information bits without spending extra resources. Hence defragmentation can speed up your system. To defragment a drive on Windows 10:
- Type “Defragment” on Search Windows and click on “Defragment and Optimize Drive“.
- Select the drive partition that you want to defragment.
- Click on “Analyze“.
- If you see the result is over 10% then click on “Optimize“.
- You can also set schedules for drive Optimization, however for this, go to “Change setting” option under “Scheduled optimization”.
Remember, If you have SSD hard drive then you need not defragment your drive, this only applies for the optical drive.
Stop Applications Running in Background:
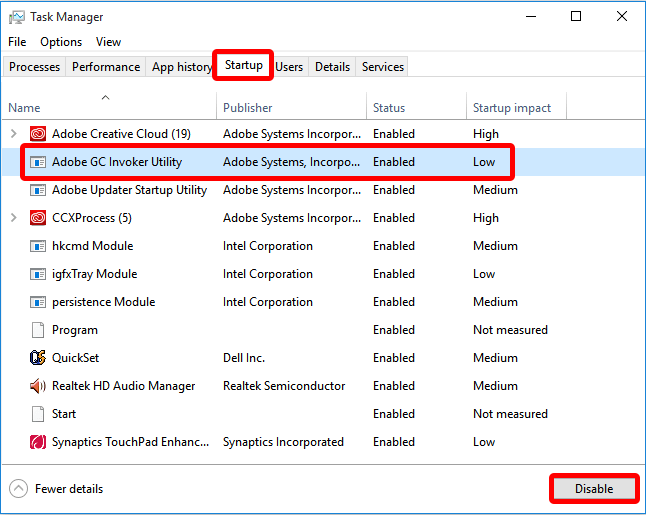
 Whenever you turn on Windows 10, Many applications start automatically and run in the background without any acknowledgement. This feature is helpful for applications you use a lot as it let you access those applications quickly. However, applications you don’t use often but run in background only consume system resources. Sometimes this may cause a drop in speed of your system additionally if also increase the time taken by Windows to start. To stop unnecessary applications running in the background:
Press Ctrl + Alt + Delete, select Task Manager, select Startup, select the program you want to stop from starting automatically, then select Disable.
Last Few Words:
These are the preliminary fixes that can boost up Windows 10 speed. However, if you don’t see any improvement after applying these fixes then there may be other issues which slow down your system. For example- if your Processor is not compatible with Windows 10 or RAM of your system is not enough then OS might not work smoothly. So make sure your system is fully compatible with Windows 10 before using it otherwise, go back to Windows 7 for best performance. Also if you know any other fixes that can boost up the speed of Windows 10 then let me know through our comment system.


