
Hide Entire Drive Partition By Removing The Drive Letter:
You May Like This : 2020~Three Easy Way To Hide A File or Folder On Windows 10
(A) Remove Drive Letter Using Command Prompt:
Step 2: Click Yes in the pop-up box.
Step 3: Type “diskpart” on the command prompt and press Enter.
Step 4: Type “list volume” and press Enter which will show you the list of drives those connected with your system.
Step 5: Choose the drive carefully that you want to hide and then type the drive number after “select volume” and hit Enter.
For example – select volume 0
Step 6: Now type the letter associated with the respected drive after “remove letter” and press Enter again.
Example – remove letter H
Step 7: Type “exit” and hit Enter.

To access the drive again follow the above mention steps (steps 1 to 7) but in step 6 replace “remove letter” by “assign letter”
Example – assign letter H
(B) Remove Drive Letter Using Disk Management:

Step 3: Click on “Change Drive Letter and Paths“.


To unhide the drive again
Step 1: Run “Disk Management“
Step 2: Select and right-click on the drive that is already hidden(Generally its remains blank).
Step 3: Click on “Change Drive Letter and Paths”.
Step 4: Click on “Add” and select “Assign the following drive letter“
Step 5: Click on Ok. Additionally, you can also choose a different letter for the respective drive.

Hide Entire Drive Partition By Windows 10 Registry Editor:
Step 2: Type “regedit” on the box and then click on OK to run the Registry Editor.


Step 5: Again find Microsoft under Software and double-click on it.
Step 6: Similarly double-click on Windows.
Step 7: Then double-click on CurrentVersion.
Step 8: Double-click on Policies.
Step 9: Double-click on Explorer.
Step 10: Right-click on Explorer.
Step 11: Spot New and navigate DWORD (32-bit) Value then click on it.

Step 13: Double-click on NoDrive.
Step 14: Under the Base of the Edit DWORD (32-bit) Value pop up box, check the box next to decimal.

Step 16: Now click OK and close the registry.
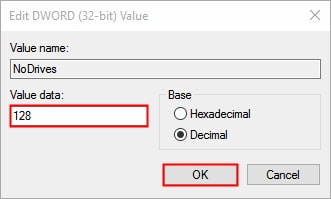
List of decimal values-A: 1, B: 2, C: 4, D: 8, E: 16, F: 32, G: 64, H: 128, I: 256, J: 512, K: 1024, L: 2048, M: 4096, N: 8192, O: 16384, P: 32768, Q: 65536, R: 131072, S: 262144, T: 524288, U: 1048576, V: 2097152, W: 4194304, X: 8388608, Y: 16777216, Z: 33554432, ALL: 67108863.
After restarting the computer the file will become hidden but it remains accessible. To undo the changes go to Registry Editor and delete NoDrives then reboot your system.
Hide Entire Drive Partition By Windows 10 Group Policy:
Another easiest way to hide the entire drive partition is by using group policy on Window 10. However, there are some limitations of using group policy; i.e., a limited number of drive combination are available here. To hide specific drives using Group Policy:
Step 1: Press “Win+R” key together and then type gpedit.msc.
Step 2: Now click Ok to open local group policy editor.
Step 3: Navigate through the following path
User Configuration > Administrative Templates > Windows Components > File Explorer
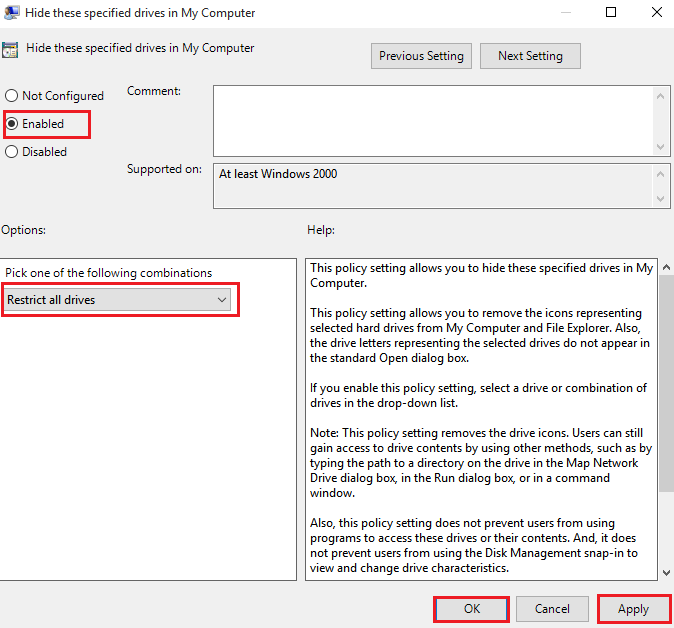
Step 4: Find and double click on the Hide these specified drives in My Computer.

Step 5: Check Enable option
Step 6: Now under Options select the drive combinations you want to hide from the drop-down menu.
Step 7: Click Apply and then Ok.
Once you complete the above steps the specific drive combinations will not be visible on File Explorer. But remember that hiding entire drive using Windows 10 group policy means hiding drive by removing the drive icon only. You will still be able t access the drive content from the address bar of File Explorer or from Command prompt.
To unhide the drive follow the above steps (up to step 4) and check the Not Configured options
Conclusion:
Plenty of third party applications are already there for Windows 10 where you can hide any files, folders or entire drive in a few click. But if you want to use Windows resources to hide those files, folders or drive then you can follow these tips.


Way cool! Some extremely valid points! I appreciate you penning this article and the rest of the site is extremely good. Doroteya Delmor Cullan
When some one searches for his required thing, thus he/she wants to be available that in detail, thus that thing is maintained over here. Selina Shannon Desdemona
My partner and I absolutely love your blog and find nearly all of your post’s to be exactly
what I’m looking for. can you offer guest writers to write content in your case?
I wouldn’t mind writing a post or elaborating on many of the subjects you write concerning here.
Again, awesome web site!
Very good article! We will be linking to this great article on our website. Keep up the good writing. Madelon Tybalt Verdie
outstanding post
faultless post, i love it
superb article
very good content, i like it
outstanding article
The next time I read a blog, Hopefully it does not disappoint me as much as this particular one.
I mean, I know it was my choice to read, nonetheless I actually
believed you would probably have something interesting to say.
All I hear is a bunch of whining about something you could fix if you were not too busy seeking
attention.
Greate post. Keep writing such kind of information on your blog.
Im really impressed by your blog.
Hello there, You’ve done a fantastic job.
I will certainly digg it and in my opinion recommend to my friends.
I’m sure they will be benefited from this website.
This web site truly has all of the information I wanted concerning this
subject and didn’t know who to ask.
Wonderful blog! I found it while searching on Yahoo News. Do you have any tips on how to
get listed in Yahoo News? I’ve been trying for a while but I never seem to get there!
Thank you
continuously i used to read smaller content that also clear their motive, and that is also happening with this paragraph which
I am reading at this time.
I go to see each day a few web pages and sites to
read posts, however this webpage provides feature based posts.
An outstanding share! I have just forwarded this onto a coworker who had been conducting a little research on this. And he in fact bought me dinner simply because I found it for him… lol. So allow me to reword this…. Thanks for the meal!! But yeah, thanks for spending time to talk about this topic here on your site.
Thank you for the auspicious writeup. It in fact was a amusement account it. Look advanced to more added agreeable from you! However, how could we communicate?|
There is definately a great deal to learn about this issue. I really like all the points you made.
Aw, this was an incredibly nice post. Spending some time and actual effort to make a superb article… but what can I say… I hesitate a lot and never seem to get nearly anything done.|
Hi there! This article could not be written any better! Looking through this article reminds me of my previous roommate! He constantly kept talking about this. I will send this post to him. Fairly certain he’ll have a very good read. Many thanks for sharing!